Tart Crust Recipe
A good tart crust is buttery, flaky and sturdy enough to hold its contents. This recipe works well for quiche, fruit tarts and more!

A good tart crust is hard to beat. It’s the glue that holds everything together when it comes to quiche and more. This recipes yields a perfectly buttery and flaky crust that is sturdy enough to hold whatever filling you decide upon. I’ve included plenty of photos to set you up for success when making a tart shell!
Tart crust ingredients
Tart crusts require the same ingredients as pie crust. You need flour, sugar, salt, shortening, butter and ice water. Make sure all the ingredients are cold, especially the shortening, butter and water. This will guarantee a flaky, tender pastry shell and prevent a tough crust.


How to make tart crust step by step
Once you have your ingredients, there are a few steps to a successful tart crust. The 3.5 cup size food processor is my favorite for this type of crust. It’s the perfect size! However, you can also use a pastry cutter instead.
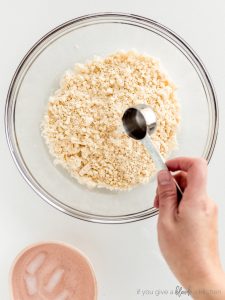
- Combine flour, sugar and salt in the bowl of a food processor. Pulse a few times to whisk together. Cut shortening into the flour mixture, about ten 1-second intervals until the mixture resembles coarse sand. Cut butter into the mixture. Again, about ten 1-second pulses until the mixture is pale yellow and the contents are the size of small peas.
- Transfer dough to medium bowl and sprinkle ice water over dough. Use a silicone spatula to mix together using a folding motion. The dough should be sticky and form into large clumps. If not, add another tablespoon of water. Form dough into a 6-inch disc. Wrap in plastic wrap and chill the dough in the refrigerator for 1 hour.
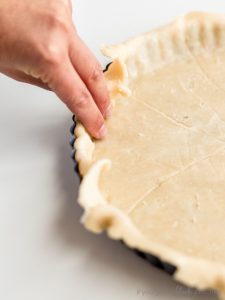
- Roll chilled dough out between two sheets of parchment paper or on floured surface. Roll to a 12-inch circle. Transfer dough to 9-inch tart pan letting some of the dough hang over the sides. Carefully press dough into the bottom and sides of the pan. Fold excess dough inwards to create a thicker crust. Refer to photos!
- Chill dough-lined tart pan uncovered until firm, about 40 minutes. Then transfer to freezer until very cold, about 20 minutes. Keep scrolling for pre-baked tart crust instructions.


Tips for successful tart crust
The perfect tart crust is achievable! My most important tip is to keep your ingredients cold. This prevents gluten from forming, which causes a tough pie crust. Avoid using your hands so there is little heat added to the dough when you are working with it. The only time I use my hands is when forming the dough into a disc and crimping the edges of the dough in the pan. Move quickly and avoid overworking the dough.
I think the photos below are the most important for how to make your tart crust look beautiful and remain sturdy. Instead of cutting the excess dough, fold it inwards and press gently with your fingers. This will form a shortcrust on the sides that is about 1/4-inch thick.


How to prevent crust from shrinking
This is a common problem for pre-baked pie crusts. Luckily, there is a solution! You need a two step chilling process. First, chill the dough-lined tart pan in the refrigerator for 40 minutes. This will relax the gluten and prevent it from shrinking. Then freeze it for 20 minutes to ensure a flaky crust.
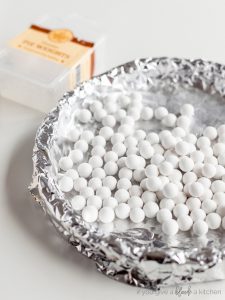
Finally, use pie weights! I can’t emphasize this enough. Metal or ceramic pie weights are heavy and heat up to help evenly brown the crust. I LOVE these pie weights that I own (you’ll need two sets). Every time I use them they work like a charm! In a pinch, you can use beans or rice (but they’re not as heavy).


Recipes that use tart crust
Here are a few recipes you can try that will use your perfect tart shell!
- Quiche lorraine is made with gruyère cheese and bacon for a rich, flavorful breakfast dish.
- Lemon tart – Spruce Eats blog
- Classic fruit tart – How to Feed a Loon blog
- French apple tart – Entertaining with Beth blog

A prebaked tart shell works well for a variety of tarts, but spinach mushroom quiche is my favorite. What will you make with this tart crust? Let me see by tagging @ifyougiveablondeakitchen on social media when you bake!

Get the Recipe: Tart Crust Recipe
Ingredients
- 1 ¼ cups (158 g) all-purpose flour
- 1 Tablespoon (15 g) granulated sugar
- ½ teaspoon (3 g) salt
- 3 Tablespoons (45 g) vegetable shortening, chilled and cut into 1/4-inch pieces
- 4 Tablespoons (60 g) unsalted butter, chilled and cut into 1/4-inch pieces
- 3-5 Tablespoons (45 ml) ice water
Instructions
Tart Pastry Dough
- In the bowl of a food processor1, combine flour, sugar and salt until whisked together. Add shortening and process until the mixture resembles coarse sand, about ten 1-second pulses. Add butter and process until the mixture forms small pea-sized pieces, about ten more 1-second pulses. Transfer mixture to a medium bowl.
- Sprinkle 3 tablespoons ice cold water over the mixture. Use a rubber spatula to mix ingredients in a gentle folding motion. Stop mixing once the mixture is sticky and forms large clumps. If the mixture is not coming together, add another tablespoon of water.
- Without overworking the dough, use your hands to form dough into a 6-inch disc. Wrap in plastic wrap and chill the dough in the refrigerator for at least 1 hour.2
- Remove dough from the refrigerator, unwrap it and place between two square pieces of parchment paper 12 inches wide (alternatively, you can roll dough on a floured work surface). Use a rolling pin to roll the dough into a circle 12 inches in diameter. Carefully transfer the dough to a 9-inch tart pan.
- Very gently, use your fingers to press the dough into the bottom and sides of the tart pan allowing excess dough to hang over the sides. Then, fold the excess dough in on itself so the edges of the tart pan form a crust about 1/4-inch thick. It doesn't have to look perfect since this is the inside of the tart.
Pre-Baked Tart Shell
- Place dough-lined tart pan in the refrigerator to chill until firm, about 40 minutes. Transfer tart pan to the freezer until very cold, about 20 minutes.
- While the tart pan is in the freezer, preheat your oven to 375° F. Remove tart pan from the freezer and double line it with aluminum foil. Place pie weights on top of the foil.
- For a pre-baked tart crust, bake dough-lined tart pan for 25 to 30 minutes or until the dough looks dry and pale in color. For a partially baked crust, bake 35 minutes or until light golden. For a fully baked crust, bake 40 minutes or until dark golden in color.
Notes
- Instead of a food processor, you can use a pastry cutter to cut the shortening and butter unto the flour.
- If you are making the dough ahead of time, it can keep in the refrigerator for up to 24 hours. Allow it to sit at room temperature for 5 to 10 minutes or until malleable before rolling out the dough.


7 Comments on “Tart Crust Recipe”
This good tart crust looks totally awesome!
Loved making this simple crust, decided to make a broccoli bacon quiche and was so glad this crust held it together (it was delicious, too!)
Thanks for the tip about pie weights. I love coming to your blog and finding helpful products I never knew even existed but make life in the kitchen so much easier.
My family loves tarts a lot. I should try your recipe!
Haven’t enjoy a tart in quite some time! Looking forward to making this to whip up something later this week!
This came out perfect! the tip for helping it not shrink did the trick!
Hi
Looking forward to trying this recipe. It looks awesome.
I have a 12′ tart pan how would I adjust the crust recipe to accommodate a 12′ pan?