Mini Chocolate Chip Scones
These mini chocolate chip scones are little morsels for any time of day—breakfast, afternoon tea, or dessert. Enjoy them in just two bites!

Craving a sweet, tender baked good snack? I have your fix. These mini chocolate chip mini scones are little morsels for any time of day—breakfast, afternoon tea, or dessert. They are the perfect pick-me-up you can enjoy in just two bites!
I’ve been rethinking scones for a while now. The typical scone is almost the size of your fist, which is great if that’s all you’re having with your coffee at breakfast. But what about at a morning meeting? Or brunch with friends? Or as an afternoon snack?
It seems a little indulgent (although I’ve totally scarfed down a whole scone as an afternoon snack before). That is why I’m introducing the two-bite scone.

Two-bite scones are self-explanatory. They are mini scones that can be consumed in two bites of course! You have all the enjoyment and deliciousness of a regular scone, but in a bite-sized portion.
My first two-bite scone recipe is a standard chocolate chip scone recipe using mini chocolate chips. Each scone is a triangle about two and a half inches top to bottom.

To achieve the two-bite portion you have to divide the dough into five discs, each about four to four and a half inches in diameter. Cut the discs into six triangles (like a pizza) and you will have a small enough scone to eat in two bites!
Check out the pictures below for a better idea of how to cut the scones. I suggest using a heavily floured work surface and an extra sharp knife for clean cuts.
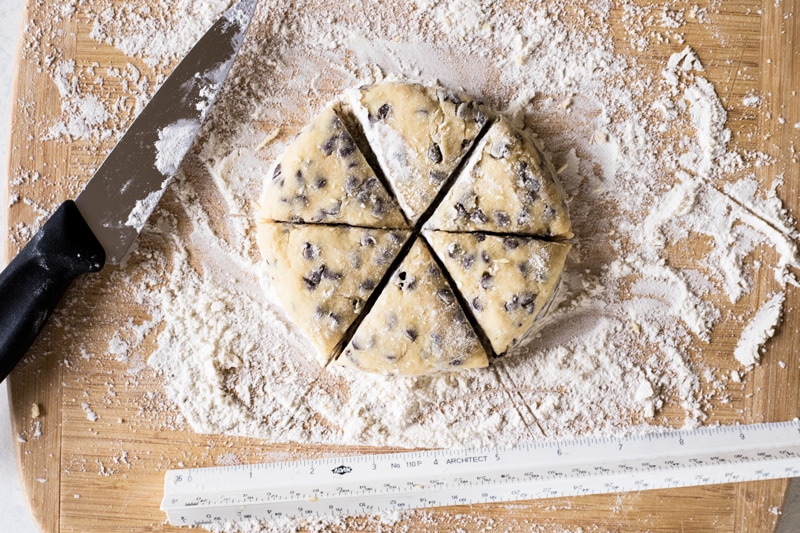
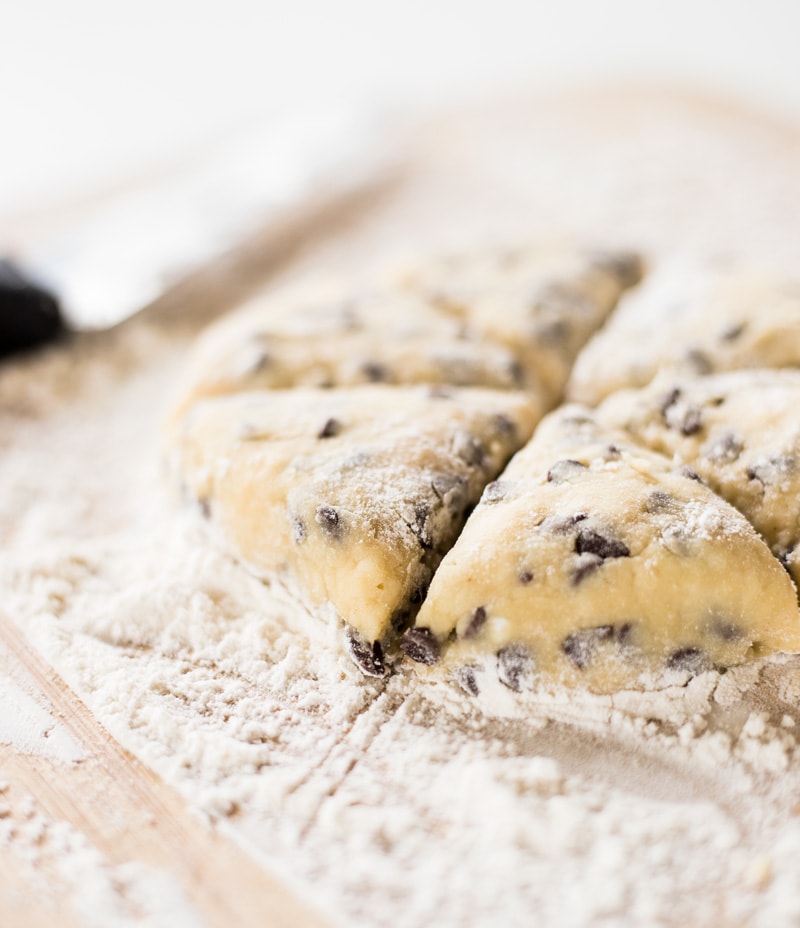
At only 140 calories each, these mini scones are perfect to serve when you have friends over for brunch or if you have kids who tend to not finish their food. Or you can make them and have a grab-and-go snack all week long.
Believe me, you will find reasons to eat these mini scones!

This recipe was updated June 2018. The ingredients remain the same, but the cutting instructions have been updated for better sized scones and is easy-to-follow steps.

Get the Recipe: Mini Chocolate Chip Scones
Ingredients
Scones
- 2 ¾ cups unbleached all-purpose flour
- ⅓ cup sugar
- ¾ teaspoon salt
- 1 tablespoon baking powder
- ½ cup (1 stick) cold, unsalted butter, , cut into 1/2 inch cubes
- 1 ½ cups mini chocolate chips
- 2 large eggs
- 2 teaspoons vanilla extract
- ½ cup low-fat milk
Glaze
- 1 cup confectioners’ sugar,, sifted
- 1-2 tablespoons milk
- ½ teaspoon vanilla, optional
Instructions
Scones
- In a large mixing bowl, whisk together the flour, sugar, salt and baking powder. Work in the butter just until the mixture is unevenly crumbly. It’s okay for some larger chunks of butter to remain unincorporated. Stir in the chips or finely chopped chocolate.
- In a separate mixing bowl, whisk together the eggs, vanilla, and milk.
- Add the liquid ingredients to the dry ingredients and stir until all is moistened and holds together. Stir in additional milk (one tablespoon at a time) if the dough seems dry, and doesn’t come together.¹
- Working on a heavily floured surface, divide the dough into five round discs, about 4″ to 4 1/2″ in diameter and a scant 3/4″ thick. Make sure the surface underneath the dough is very well floured. Cut each disc into six triangles (like cutting a pizza). This is all easily accomplished with a rolling pizza wheel or sharp knife.²
- Transfer the scones to a parchment-lined baking sheet. They can be set fairly close together as they will not spread much during baking. You should be able to crowd them all onto an 18" x 13" half-sheet pan. Place the pan of scones in the freezer for 30 minutes, uncovered. While the scones are chilling, preheat the oven to 425° F.
- Bake the scones for 12 to 14 minutes, or until they’re golden brown. Remove the pan from the oven, and allow the scones to cool right on the pan.
Glaze
- Make the glaze by stirring together the sugar, milk and vanilla in a small bowl. Place the scones to a rack set over parchment, to catch any drips from the icing. Using a large spoon (or by placing the icing in a icing bag) drizzle the icing over the scones. Allow the glaze to set before serving. Scones can be kept in an airtight container at room temperature for five days.
Notes
- Be careful not to overwork the dough as it will result in tough scones.
- Flour your knife each time you make a cut to prevent the dough from sticking to your knife.
- Scones are best when eaten the day they are baked. However, they can be stored in an airtight container at room temperature for up to three days.
- Updated June 2018: Cutting instructions have been updated to easier terminology. Originally this recipe called for forming the dough into a square and cutting into smaller squares and triangles. This new disc method makes better sized scones and is easier to understand.
Recipe adapted from King Arthur Flour








24 Comments on “Mini Chocolate Chip Scones”
This is genius! It’s so true, everything is so oversized – love finding reasonable ways to be healthy without giving up on delicious foods 🙂 Very clever!
Thanks, Jenny! I love downsizing portions so I can keep eating the foods I love too!
These scones look delicious! And your pictures are just beautiful!! “Mini” things are SO much better than their normal size counterparts! 🙂
Thanks, Laura! I agree – mini IS better 🙂
Is there a reason you wait until after they are baked to cut them the last time, instead of just cutting them into the mini size before?
Hi Elizabeth, good question! When they are cut into that bite-sized size before going into the oven, they bake way too quickly and become too dry. They can also lose their triangular shape. Hope that helps!
I’m trying to decide on a recipe for my first scones. I noticed you use 2 eggs and the other recipes call for one egg. What is the difference in texture. Is 2 eggs more of a cake like texture?
Cute idea! Pinning now. Great way to get just a bite and not waste the rest while at a tea. Thanks!
I tried these for a first birthday tea party this weekend and they were perfect! Followed the directions precisely and we all loved them. (I didn’t cut them in half after they were baked, and they were still a great size.) Many thanks!
These are so adorable! Perfect to go with a coffee in the morning.
My husband and I love scones but never have ventured on baking them. Your recipe looks fairly easy and quick I might surprise him this weekend, thanks!
My kids love scones and anything with chocolate chips, I can’t wait to make this recipe with them!
Your photos are beautiful and I’m totally drooling over these! They wouldn’t last long in my house!
What a tasty little treat. Plus they are bite sized which means I can have more.
I am confused about the cutting of the scones. The directions make no mention of cutting twice. Simply reads cut into six segments like a pizza.
But in the comments section, two people remark about cutting after baking.
Do we keep 4 inch circles tight during baking? Or do we separate out the slices?
Hi Jane! This recipe was updated June 2018. The cutting instructions have been updated to easier terminology. Cut the discs into triangles prior to baking. There is no cutting after the baking process. Originally this recipe called for forming the dough into a square and cutting into smaller squares and triangles. This new disc method makes better sized scones and is easier to understand.
This is a great recipe: making these scones is quick easy and the results totally professional, even for someone, like me, who has never made scone ms before. I made a batch following the recipe exactly and used it as a base for lemon scones (adding lemon zest to the dry ingredients and mix of squeezed lemon and orange juice to the dry) and both were perfect. My compliments to this Blonde Baker!
That is a huge compliment! Thank you and congrats on your first batch of scones!
Hello! I made these last December for a large gathering of ladies. I really liked the old cutting method but can not find my printed version. Would you please tell me the old directions. They were PERFECT!!!
Hi Jenn! The new cutting method creates similar sized scones, but I have the old method right here…
With rubber spatula, transfer dough to lightly floured work surface. Knead dough 6 to 8 times, until it just holds together. Pat/roll it into an 8″ to 8 1/2″ square, a scant 3/4″ thick. Make sure the surface underneath the dough is very well floured. If necessary, use a giant spatula to lift the square, and sprinkle more flour underneath.
Cut the square four times horizontally and four times vertically to create 16 two-inch squares. Now, cut each square in half diagonally, to make 32 small triangles. This is all easily accomplished with a rolling pizza wheel.
After you bake the scone and they have cooled slightly, cut the triangles in half again to create smaller scones. However, if the scones are already a size you like, the post-baking cutting step is optional.
– Be careful not to overwork the dough as it will result in tough scones.
– Flour your knife each time you make a cut to prevent the dough from sticking to your knife.
These are delicious!!! I’ve made them several times. Today I made some for an afternoon coffee break! Not very hard to make and they look so cute!!😉
Hi there! These look so cute and sound delicious! Can you make the dough a day or two ahead of time? Possibly bake from frozen?
Hi Diana! I have not made these scones ahead of time. If you do freeze the dough, I suggest defrosting in the fridge first, then baking them cold from the fridge.